Principle 1:
Deep Soil Preparation
Goal: Build Soil and Soil Structure
Looking at GB as a three-legged stool, deep soil preparation is one of the legs. Deep soil preparation builds soil and soil structure by loosening the soil to a depth of 24 inches (60 cm).
Ideal soil structure has both pore space for air and water to move freely and soil particles that hold together nicely. Air supports plant roots and soil organisms that give life to the soil and enhance nutrient availability for the plants. Aerated soil holds water better than compacted soil, requiring less watering. It also facilitates root penetration, supporting healthy plants and minimizing erosion.
To prepare the soil on your farm, determine where your growing beds will be and where your paths will be. (Paths are necessary because stepping on the bed compacts the soil, reversing the process of digging.) Recommended bed dimensions are 4-5 feet (1-1.5 m) wide and 20-25 ft (6.5-10 m) long for a total of 100 ft2 (10 m2). This bed size works well for labor and space efficiency, and for water retention. Make your paths wide enough for you to work easily, but not so wide that you sacrifice growing space unnecessarily.
Hint:
Make the work easier by allowing the soil to gently slide off the digging spade into the open trench, by letting your weight sink the fork into the lower trench, and by raking after every 5 trenches!
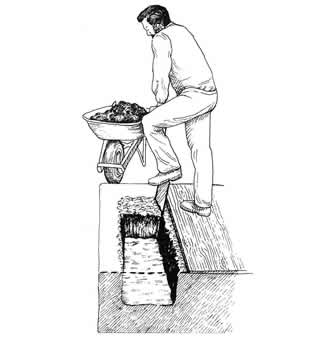
To double-dig, stand on a digging board positioned 12 in (30 cm) from the end of the bed. Facing the end, use a flat digging spade with a D-handle (or the tools available to you) to remove soil to make the first trench, 12 in x 12 in x 5 ft (30 cm x 30 cm x 1.5m). Put the soil you dig out of the trench in a bucket, basket, wheelbarrow or pile to save for later. Some of this soil will go back into the bed to complete the double-dig, and some can be used for compost building and to start seeds. (More about the uses for bed soil later.)
Images 1: Digging the first trench; 2: Loosening the soil at the bottom of the trench
With a D-handled digging fork (or other locally available tool), gently loosen the lower level of the first trench 12 in (30 cm) deep. If you cannot penetrate 12 in (30 cm), simply loosen as deeply as you can. Each year the soil will improve from a combination of double-digging and the growing action of roots, until you are able to achieve a loose, healthy soil structure to the full 24 in (60 cm).
Hint:
When digging or planting, put a strong, wide digging board on the bed to distribute your weight and avoid compacting the soil.
Roll over the picture with your mouse to view second image
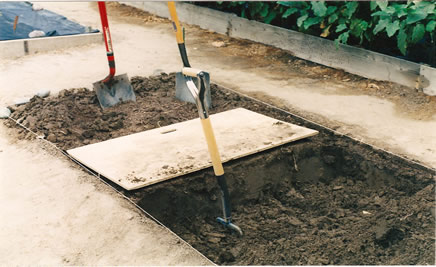
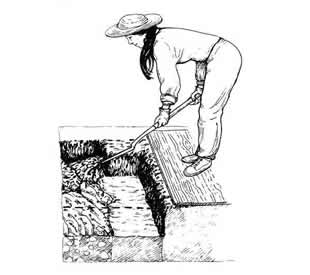
Images : A bed being prepared using the double digging method, using shovel, spading fork, and digging board; 2: A group of GROW BIOINTENSIVE workshop participants getting hands-on practice double-digging.Next, move your board 12 in (30 cm) back from the first trench to expose more soil to begin the second trench. Using your digging tool again, move the soil from the top 12 in (30 cm) into the first trench. Now you have a new trench. Loosen the soil in the bottom of this second trench, as deeply as you can.
Roll over the picture with your mouse to view second image
Images : 1: Moving the soil from one trench to another;
2: Raking the bed to maintain the shape and depth.Repeat this pattern until you reach the other end of the bed. At the end you will have one last trench to fill. This soil comes from the soil you removed from the first trench. Fill the trench and rake your soil smooth, your bed is ready for compost. You have crafted the first leg of the stool.
Notes to Refine Deep Soil Preparation:
Soil of proper moisture level (like a wrung-out cloth) will be the easiest to work with. If the soil is too dry or too wet it is more difficult to dig and the soil structure can be damaged in the process. Make your job easier and take care of the soil by watering the bed or keeping it dry, as appropriate, in preparation for digging.
- Choose cool and comfortable times of day for digging. Working in the heat of the day exposes the soil organic matter to accelerated oxidation and more will be lost. The farmer uses less energy digging in the cool of the day, too!
- If the soil is very compacted, it may not be possible to dig 24 in (60 cm). Simply dig as deeply as you can and let the plant roots help you. You can plant deep-rooting crops to accelerate this process. Remember this is part of building soil structure, over time the full depth will be achievable!
- Another important part of building soil structure is supporting the beneficial interactions between the organisms living in the soil, the roots, and the soil itself. The disruption of deep soil preparation is best limited to once every growing season, until good soil structure allows you to dig less often.
- If your soil is overly loose due to sand, double-digging is not helpful. Instead you will want to build soil structure by adding organic matter in the form of compost and keeping plants growing year-round so roots can support soil microbial life.
GB Farmer’s Challenge:
Watch your soil grow and change. Remember the goal of deep soil preparation is to build soil and soil structure, not to double-dig. Before you dig, check the soil down to 24 in (60 cm), if it is loose all the way down you might only single-dig (gently loosening the top 12 in (30 cm) with a digging fork, like you do for the lower trench in the double-dig) or even just loosen the top surface of the soil 2-4 in (5-10 cm) so it is ready for compost and planting.


